

Simple Weekend DIYs For Your Dreamy Backyard
Some of the links on this blog are affiliate links, which means I may earn a small commission if you click through and make a purchase—at no extra cost to you! I only recommend products I truly love and think you’ll find useful too. Thank you for visiting and supporting this blog! To read more about our Affiliate program, click here.
Imagine stepping into your backyard and feeling like you’ve entered a little slice of paradise—crafted by your own hands. Whether you’re dreaming of string-lit evenings, cozy nooks for morning coffee, or playful touches that make your space feel uniquely yours, this weekend is the perfect time to start. In this post, we’re diving into simple, satisfying DIY projects that transform your outdoor space into a dreamy retreat. No heavy tools or contractor skills required—just a few hours, a dash of creativity, and a love for making your home feel like home, inside and out.
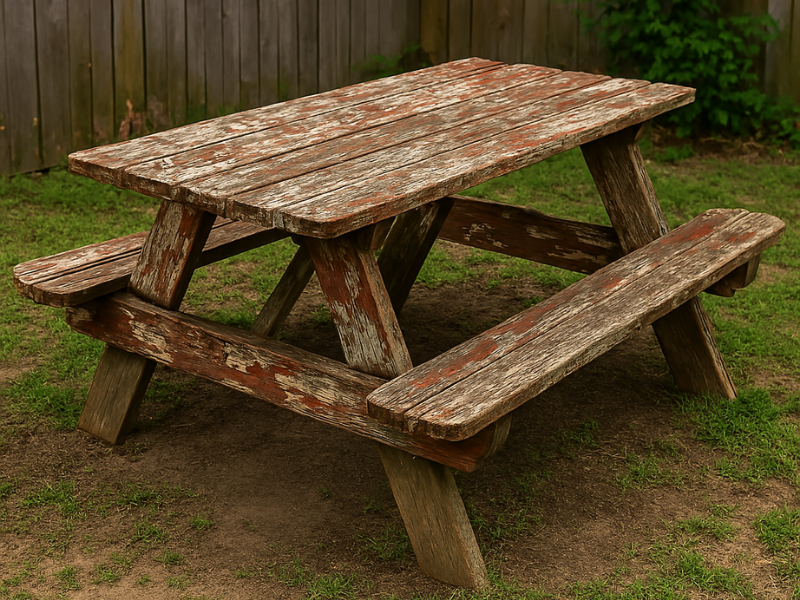
How to Give Your Picnic Table a Makeover: Sanding & Staining Made Simple
Picnic tables take a beating—rain, sun, spilled drinks, the occasional arts and crafts project gone wrong. If yours is looking a little worse for wear, don’t worry! A little sanding and staining can work wonders, making it look fresh and ready for all your backyard hangouts.
Here’s a simple step-by-step guide to breathe new life into your table.
Step 1: Gather Your Supplies
Before you start, round up your materials:
Sandpaper (80-grit for rough spots, 120- to 220-grit for a smooth finish)
Power sander (optional, but a total lifesaver)
Wood stain (oil-based lasts longer, water-based dries faster)
Wood sealant (for extra protection)
Drop cloth (to keep things tidy)
Step 2: Sanding It Down
Sanding helps get rid of old finish, dirt, and splinters, so your stain goes on nice and even.
Start rough. Use 80-grit sandpaper to tackle worn-out spots and smooth the surface. A power sander can make this step faster and more consistent—especially for larger areas or uneven wood.
Go finer. Switch to 120- or 220-grit sandpaper for a polished feel.
Wipe it clean. Use a cloth to remove dust before staining.

Step 3: Staining for a Fresh Look
Stain adds color and helps protect the wood. Here’s the best way to apply it:
Brush it on evenly. Work in the direction of the wood grain.
Let it soak in. Give it time to absorb—follow the instructions on the stain.
Add another coat if needed. If the color’s too light, go in for a second round.

Step 4: Seal the Deal
A sealant locks everything in and keeps your table protected from the elements.
Pick the right sealant. Polyurethane or spar urethane works great for outdoor furniture.
Apply a thin layer. Use a brush and keep it smooth.
Let it dry completely. Some sealants need multiple coats—read the label.
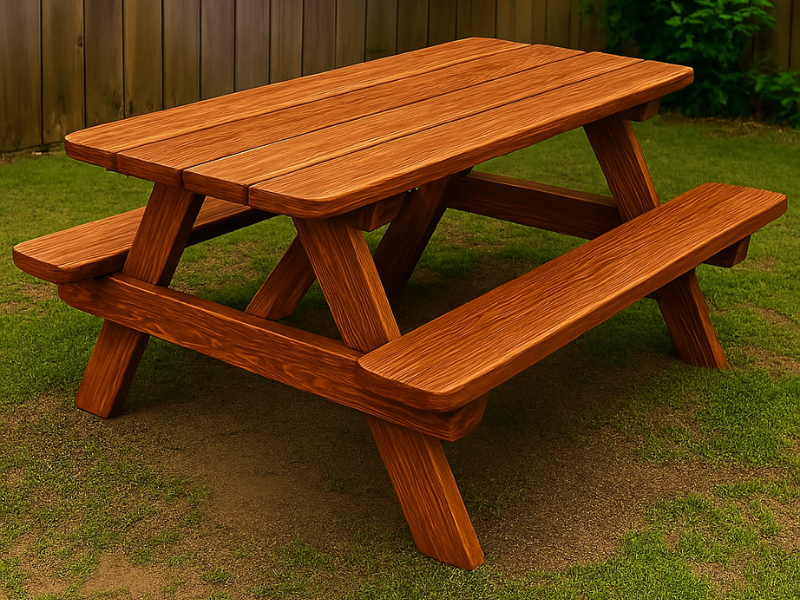
Step 5: Enjoy Your Upgraded Table!
Once everything’s dry, your table is ready for action! Whether it’s BBQ nights, coffee mornings, or a place to drop your gardening tools, it’ll look great and last longer.
DIY Outdoor Cushions: A Simple Guide to Stylish Seating
Looking to upgrade your outdoor seating without breaking the bank? Custom outdoor cushions are the perfect way to add comfort and personality to your patio, porch, or garden seating. The best part? You don’t need fancy upholstery skills—just some plywood, seat cushions, fabric, and a staple gun! This DIY project is easy, budget-friendly, and lets you create cushions that match your style.
Let’s break it down step by step and get your outdoor space looking great!
Step 1: Gather Your Materials
Before you start, here’s what you’ll need:
Plywood or EVA Foam Sheets (cut to the size of your seating area)
Seat cushions or foam (for comfy support)
Outdoor fabric (weather-resistant for durability)
Staple gun & staples (to secure the fabric)
Scissors (for cutting the fabric)
Spray adhesive or fabric glue (optional, helps hold the fabric in place before stapling)
Step 2: Prep Your Cushion Base
Cut the plywood or base material to match the size of your seat area. If you're making multiple cushions, cut pieces for each. **Note: You can ask your local construction store if they can cut it for you, just make sure you have your measurements ready for them
Attach the seat cushion or foam to the plywood using spray adhesive or fabric glue. This step helps keep the padding in place.
Step 3: Wrap & Staple the Fabric
Lay out your fabric with the pattern or design facing down. Place your plywood and cushion on top.
Cut the fabric so you have enough excess to wrap around the sides (about 3-4 inches extra on each side).
Stretch the fabric tightly over the cushion and begin stapling it to the back of the plywood. Start in the middle of each side and work outward, pulling the fabric snug as you go.
Tidy up the corners. For a neat finish, fold the corners like you’re wrapping a present and staple securely.
Double-check for any loose areas, then trim off excess fabric if needed.
Step 4: Enjoy Your New Cushions!
Once your cushions are assembled, place them on your outdoor seating and admire your handiwork! Whether you’re adding extra comfort to a bench, chair, or built-in seating, this simple DIY is a game-changer.
Bonus tip: If you want extra durability, consider spraying the finished cushions with a fabric protector to resist stains and moisture.
Now that you’ve got stylish, cozy outdoor cushions, all that’s left to do is sit back, relax, and enjoy your refreshed space. What do you think? Ready to tackle this project?